How to Pack a Backpack for Great Walks
TL;DR: Quick Packing Guide for Great Walks
Middle zone: Heavy items (food, stove, water) packed close to your back between shoulder blades.
Top zone: Rain jacket, insulating layers, and items you'll grab quickly on the trail.
Always use a waterproof pack liner and organize with color-coded dry bags for instant access.
Picture this: You're two hours into Day 2 of the Kepler Track, rain pelting down, and you need your waterproof jacket. But it's buried at the bottom of your pack under three days of food, your sleeping bag, and yesterday's damp socks. Sound familiar? This scenario plays out regularly on New Zealand's Great Walks.
Proper backpack packing technique can make the difference between an enjoyable multi-day adventure and a physically challenging experience on demanding terrain. The right packing strategy keeps gear organized and accessible, protects equipment from weather damage, reduces physical strain, and prevents discomfort on long hiking days across steep alpine sections and river valleys.
This comprehensive guide shares proven packing systems and techniques for New Zealand's Great Walks. Whether you're preparing for your first Great Walk or optimizing your approach as an experienced tramper, these practical methods will help you pack more efficiently, hike more comfortably, and better protect your gear.
Why Proper Packing Matters on Great Walks
New Zealand's Great Walks aren't your average day hikes. These multi-day treks demand 5-7 hours of hiking per day across terrain that can shift from alpine passes to river valleys within a single afternoon. The consequences of poor packing become painfully apparent when you're ascending the 1,400-meter climb to Luxmore Hut on the Kepler Track or navigating the exposed ridgeline in deteriorating weather.
Comfort Over 6-8 Hour Hiking Days
Your backpack will be your constant companion for days on end. An improperly packed bag creates pressure points, throws off your balance, and forces your body into unnatural postures. Studies show that hikers with poorly distributed pack weight experience up to 40% more joint strain, particularly in the knees and lower back. When you're carrying 8-12 kilograms for multiple days, every ounce matters, and every centimeter of weight placement affects your comfort.
Weather Protection in Fiordland's Unpredictable Conditions
Fiordland's weather is legendarily volatile. Milford Sound receives up to 9 meters of rain annually, and conditions can shift from sunshine to sideways rain within minutes. Snowfall occurs even in late summer months. A well-organized pack with proper waterproofing ensures your sleeping bag stays dry and your emergency layers remain accessible when weather deteriorates—a critical consideration on these exposed tracks.
Weight Distribution Reduces Injury Risk
Biomechanics research shows that optimal weight distribution can reduce the force on your knees by more than 4% with each step. Over the 60-kilometer Milford Track, that translates to thousands of kilograms of reduced cumulative stress on your joints. Proper packing technique isn't just about comfort—it's about finishing your Great Walk strong and injury-free.
Choosing the Right Backpack: The 40-60L Sweet Spot
Before we dive into packing technique, you need the right vessel. For Great Walks hut-based trips, a 40-60 liter backpack hits the perfect balance between capacity and manageable weight.
Why 40-60L Works for Great Walks Hut Trips
Unlike camping trips where you're hauling a tent, sleeping pad, and full kitchen setup, Great Walks huts provide bunks with mattresses, cooking facilities, and often gas cookers. This eliminates your bulkiest items. A 40L pack works for experienced, minimalist hikers who've mastered their packing system, while 50-60L provides comfortable breathing room for those still refining their gear list or hiking in winter conditions when extra layers are essential.
Most hikers successfully use 45-50L packs on 3-4 day Great Walks trips. If you're new to multi-day hiking, opt for 55-60L to avoid overstuffing, which can damage gear and create uncomfortable pressure points.
Getting the Right Torso Fit
Pack capacity means nothing if the torso length doesn't match your body. The hip belt should sit on your hip bones (not your waist), and the shoulder straps should start just below your shoulders without gaps. Many quality packs offer adjustable torso lengths—use them. A proper fit allows the hip belt to carry 80% of your pack weight, sparing your shoulders and back from excessive strain.
Essential Features for Great Walks
Look for these non-negotiables: a padded hip belt with pockets (perfect for snacks and phone), external water bottle pockets you can reach while walking, compression straps to cinch down your load, a brain/top pocket for frequently accessed items, and multiple internal compartments to separate gear. The hip belt should be at least 3 inches wide with substantial padding—this is where most of your pack weight will rest.
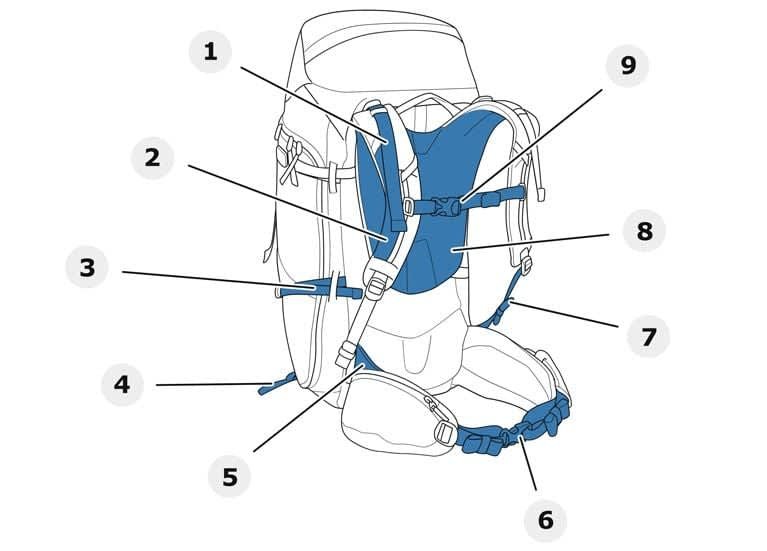
Backpack Parts Labeled:
- 1 - Shoulder Strap: Carries pack weight to shoulders; should sit snugly without gaps
- 2 - Adjustable Side Strap: Tightens pack sides for stability
- 3 - Compression Strap: Reduces pack volume and stabilizes load
- 4 - Lower Attachment Strap: Anchors heavy items close to your back
- 5 - Hip Belt Attachment: Connects hip belt to main pack
- 6 - Hip Belt: Sits on hip bones; carries 80% of pack weight
- 7 - Load Lifter Strap: Adjusted at 45° angle to prevent pack from pulling backward
- 8 - Back Panel: Maintains support and distributes pressure across your back
- 9 - Sternum Strap: Connects shoulder straps across chest; prevents shoulder roll
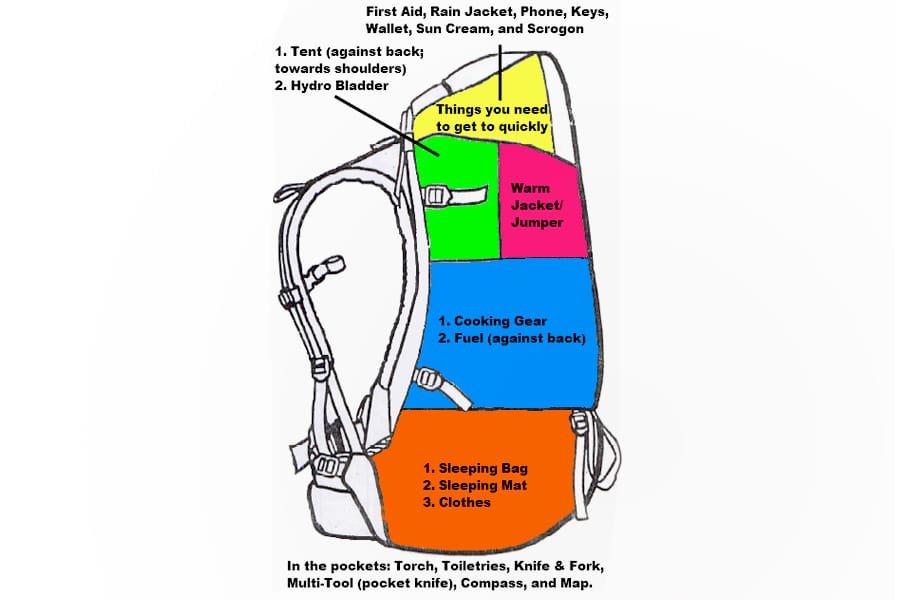
The Three-Zone Packing System: Your Great Walks Blueprint
This is the core of effective Great Walks packing organization. Think of your pack in three distinct zones, each serving a specific purpose based on weight, bulk, and accessibility needs.
Bottom Zone: Foundation and Sleeping System
The bottom of your pack is for bulky, lightweight items you won't need until you reach the hut. This is prime real estate for your sleeping bag—ideally compressed in a waterproof stuff sack. Your sleeping bag is likely your most voluminous item but relatively light, making it perfect for this zone. Also pack your sleeping bag liner, inflatable pillow (if carrying one), and camp clothes here.
Pro tip: Use a large black bin bag or purpose-built pack liner as your first waterproofing layer. Insert it before packing anything else. This simple addition has saved countless sleeping bags from Fiordland's persistent rain.
Middle Zone: The Power Core
This is where backpack weight distribution becomes critical. Your heaviest items—food bag (typically 2-3 kg for a 3-4 day trip), cooking system, fuel canister, and full water reservoir—must sit close to your back, centered between your shoulder blades. This positioning keeps the weight close to your body's center of gravity, preventing the dreaded backward lean that plagues poorly packed hikers.
Surround these heavy items with medium-weight gear like your first aid kit, extra clothing layers, and toiletries. Use softer items like your puffy jacket or spare base layer to create a buffer between hard objects and your back. Hard objects resting directly against your spine create pressure points and discomfort during long hiking days.
Top Zone: Quick-Access Essentials
The upper section of your main compartment should house items you might need on short notice: rain jacket, insulating layer (fleece or puffy), extra food, water filter, toilet supplies with trowel, and your head torch. Weather changes rapidly on Great Walks, and fumbling through your entire pack to find your rain jacket when clouds roll in is a recipe for wet misery.
If your pack has a "brain" or lid compartment, this is ideal for your first aid kit, map, compass, sunscreen, insect repellent, and emergency items like your whistle and survival blanket.
Outer Pockets and External Access
Hip belt pockets are gold for trail snacks, lip balm, and phone. Side water bottle pockets should hold your drinking water for easy access without removing your pack. Many hikers on Great Walks also appreciate a stretchy back pocket for damp items like rain jackets or that quick-dry towel you used at the hut.
What stays outside: Keep external attachments minimal. Trekking poles can clip to the sides when not in use, but avoid dangling multiple items off your pack—they create snag hazards on narrow sections and throw off your balance.
Mastering Backpack Weight Distribution: The Science of Comfort
Even with perfect zone organization, improper weight distribution will leave you exhausted and sore. Understanding these fundamental principles is key to comfortable multi-day hiking.
The 80/20 Rule: Hips Do the Heavy Lifting
Your hip belt should carry approximately 80% of your pack weight, with only 20% distributed across your shoulders. Your hips and legs are built for carrying heavy loads; your shoulders and spine are not. When properly adjusted, you should be able to shrug your shoulders with minimal pack movement.
Here's how to achieve this: Loosen all straps, put on your pack, fasten the hip belt first and tighten it snugly on your hip bones, then tighten shoulder straps just enough to keep the pack close to your body without bearing weight, and finally adjust load lifters (the small straps from shoulder strap tops to pack) at a 45-degree angle to pull the pack's top slightly forward.
Center of Gravity: Between Your Shoulder Blades
Imagine a vertical line running down your spine. Your heaviest items should cluster around the point where that line intersects with your shoulder blade tops. Too low, and you'll feel pulled backward. Too high, and you'll feel top-heavy and unstable on uneven terrain. This is especially crucial on exposed sections like the Kepler Track's alpine ridge.
Lateral Balance Matters Too
Don't just think vertically—side-to-side balance prevents that awkward lean and reduces hip strain. Distribute weight evenly between left and right sides of your pack. If you're carrying two water bottles, put one on each side. If your stove sits on the right, balance it with similarly weighted items on the left.
The Adjustment Test
Before leaving the trailhead, load your pack fully (including water and food), walk around for 10 minutes on varied terrain, and pay attention to pressure points and pulling sensations. Adjust straps incrementally—small changes make big differences. Throughout your hike, reassess as you consume food and water, which shifts your weight distribution.
Essential Organization Systems: Stay Dry, Find Things Fast
Organization isn't about being neat—it's about efficiency and protection in harsh conditions.
Pack Liner: Your First Line of Defense
Use a waterproof pack liner without exception. Even "waterproof" backpacks leak in Fiordland's relentless rain. A heavy-duty contractor-grade garbage bag (the thick black ones) works brilliantly and costs mere dollars. Purpose-built pack liners like nylofume bags offer better durability for frequent use. Line your entire main compartment before adding any gear.
Color-Coded Dry Bags for Quick Access
Use waterproof dry bags in different colors to create an instant visual organization system. Blue for clothing (extra base layers, spare socks, underwear), Red for food (makes it easy to find for meals), Yellow for electronics (battery pack, cables, camera), and Green for toiletries and first aid. This system means you can locate items in seconds, even in the dark confines of a crowded hut.
For Great Walks, compression dry bags offer double benefits: waterproofing and volume reduction. Your sleeping bag compressed in a 10-liter compression sack takes half the space of a regular stuff sack.
Small Zip-Lock Bags for Detail Organization
Within your larger dry bags, smaller zip-lock bags keep items organized and provide extra moisture protection. Use them for: First aid supplies (blister treatment separate from pain relievers), Snacks (daily rations in individual bags), Toiletries (toothbrush, toothpaste, biodegradable soap), and Electronics (keeping charging cables untangled).
The Consistent System Approach
Pack the same way every time. Your blue dry bag always goes in the same spot. Your headlamp always lives in the top pocket. This consistency becomes muscle memory—you'll grab items instinctively without thinking. With practice, you can find anything in your pack quickly, even in challenging conditions.

What to Pack (and What to Leave Behind)
Proper packing starts with bringing the right items in the right quantities. Here's what works for Great Walks conditions.
The 3-Season Clothing Layering System
New Zealand's Great Walks season runs October through April, but "summer" weather can still dip below freezing on alpine sections. Your clothing strategy should follow the layering principle:
Base layer: One worn, one spare. Merino wool excels—it doesn't stink after days of wear, regulates temperature brilliantly, and dries reasonably fast. Synthetic works too but gets smelly quickly. Most hikers wear their base layer multiple days before swapping to their spare.
Mid layer: A breathable fleece or lightweight synthetic jacket. This is your active insulation for cool mornings and when you're moving in cooler conditions. It should be easy to shed when you warm up from hiking.
Insulating layer: A puffy jacket (down or synthetic) is non-negotiable. Temperatures at Luxmore Hut or Mintaro Hut can drop significantly at night, and this layer often doubles as a camp pillow. Keep it in a stuff sack at the top of your pack for easy access.
Outer layer: A quality waterproof rain jacket with hood is mandatory. Fiordland receives over 200 days of rain annually. Waterproof over-pants are also recommended—they're lightweight, pack small, and provide excellent protection when sideways rain hits on exposed ridges.
Lower body: Quick-dry hiking pants or zip-off convertible pants. Bring one spare pair of underwear and one spare pair of hiking socks per day plus one extra set. Merino wool socks prevent blisters better than other materials.
Accessories: Beanie, buff or neck gaiter, lightweight gloves (yes, even in summer—it can snow), and a wide-brimmed hat for sun protection. Gaiters are optional but useful in wet conditions.
Food Planning: Finding the Balance
Food represents a significant portion of your pack weight. The traditional guideline suggests 900 grams (2 pounds) per person per day, but most hikers do well with 600-800 grams per day on Great Walks. You're burning significant calories but won't need the extreme intake of longer thru-hikes.
Typical daily food includes: Breakfast (oatmeal or muesli, instant coffee, protein bar), Trail snacks (nuts, dried fruit, energy bars, chocolate), Lunch (wraps with salami/cheese, or crackers with spreads), and Dinner (dehydrated meals, instant noodles, or rice/pasta with protein). Pack one extra day of food for emergencies—weather can force unexpected hut delays.
Cooking and Hydration Gear
Most Great Walks huts have cooking facilities, but bring your own lightweight stove for flexibility. A small gas canister stove, pot with lid (which doubles as your bowl), spork or lightweight cutlery, and a collapsible cup with lid cover your needs. Don't forget a small amount of biodegradable soap and a tiny cloth for cleaning.
For water, a 2-liter hydration bladder or water bottles work equally well. Great Walks tracks have reliable water sources, but carry water purification tablets or a filter as backup. Always fill up completely at each water source—dehydration significantly impacts performance and enjoyment.
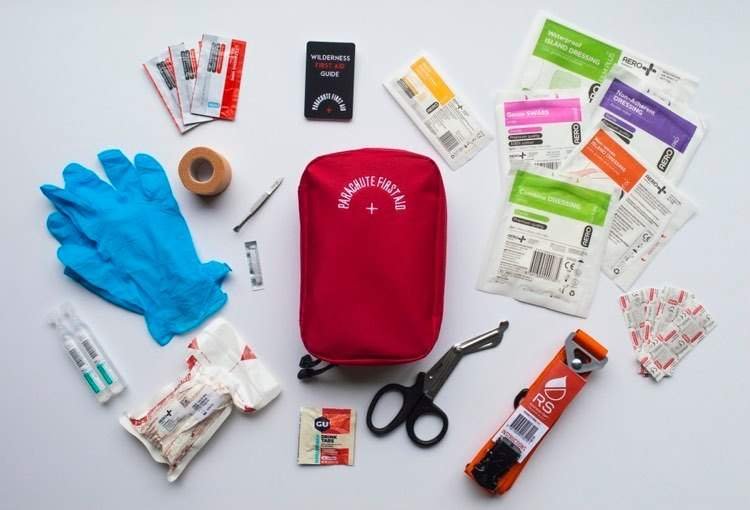
The Essential First Aid Kit
Your first aid kit should be comprehensive but not excessive. Include: Blister treatment (Compeed plasters and moleskin), Adhesive bandages in various sizes, Sterile gauze pads and medical tape, Antiseptic wipes, Pain relievers (ibuprofen and paracetamol), Antihistamines, Elastic bandage, Tweezers and small scissors, Personal medications, and Emergency whistle.
Common Packing Mistakes to Avoid
Frequent packing errors include: Overpacking clothing (you need less than you think—huts have drying rooms), Bringing cotton clothing (it stays wet and causes hypothermia), Packing heavy items at the bottom or top of pack, Not testing gear before the trip, Forgetting pack cover or liner, Skipping trekking poles (they reduce knee strain by 25%), Bringing too much food "just in case", and Wearing brand new boots (break them in first!).
Gear Recommendations: What Works on Great Walks
Based on extensive trail testing, here are top picks for Great Walks success:
Backpacks: Comfort for the Long Haul
Gregory Paragon 60 / Maven 58: This pack consistently earns top marks for comfort on multi-day trips. The adjustable torso length accommodates various body types, and the suspension system carries heavy loads without creating pressure points. The ventilated back panel keeps you cooler than most competitors, crucial on uphill grinds. The multiple pockets offer excellent organization, and the build quality ensures durability across years of Great Walks trips.
Osprey Atmos 65 / Aura AG 65: Osprey's Anti-Gravity suspension creates a floating sensation that's remarkable on long trail days. The mesh back panel and continuous ventilation keep air flowing between you and the pack. It's heavier than ultralight options at 4.6 pounds, but the comfort payoff is substantial. The integrated rain cover and multiple access points make organization effortless.
Waterproofing and Organization
Sea to Summit Ultra-Sil Compression Dry Sack: Compresses to about 70% of regular stuff sack volume, genuinely waterproof (welded seams), comes in multiple colors for easy organization. 10-liter size perfectly holds sleeping bags; 5-liter bags organize clothing efficiently. Color-coded sets work well for system-based organization.
Eagle Creek Pack-It Packing Cubes: Mesh panels let you see contents instantly and compress items efficiently; the medium cube perfectly holds 3-4 days of clothing. Proven durability.
Sleep System
Premium 3-Season Sleeping Bag: A three-season bag, quality down or synthetic insulation rated to -4°C or lower, packs incredibly small and water-resistant down maintains loft in damp conditions. Quality sleep gear improves recovery.
Sea to Summit Thermolite Reactor Sleeping Bag Liner: Adds 8-10°C of warmth, keeps hut mattresses cleaner, weighs only 250g, dries quickly. Great for chilly mountain nights.
Trekking Poles: Your Best Friends
Black Diamond Trail Ergo Cork Trekking Poles: Cork grips absorb sweat, reduce knee strain by up to 25% on descents—critical on steep sections like the Kepler Track's descent from Luxmore. They improve balance on river crossings and provide extra stability with a full pack. Collapsible design.
Trekking poles provide measurable benefits: reduce stress on knees, improve balance on uneven terrain, help maintain hiking rhythm and pace, provide stability during river crossings, and can serve as emergency shelter support. After a full day of hiking, proper poles significantly reduce lower body fatigue.
First Aid and Safety
Comprehensive Outdoor First Aid Kit: Sized for 1-4 people, includes blister treatment, wound care supplies, pain medication, and treatment instructions. Waterproof case. Supplement with extra blister supplies and personal medications.
Affiliate Disclosure: As an Amazon Associate, Wakahi earns from qualifying purchases at no additional cost to you. We only recommend gear we've tested and trust on the trails.
Your Complete Great Walks Packing Checklist
Use this comprehensive checklist to ensure you don't forget essentials:
Backpack and Organization
- 40-60L backpack with waterproof cover
- Waterproof pack liner (bin bag or purpose-built)
- Compression dry bags (3-4 in different colors)
- Small zip-lock bags for detail organization
Sleep System
- 3-season sleeping bag (rated to -5°C)
- Sleeping bag liner (adds warmth, keeps bag clean)
- Inflatable pillow (optional but appreciated)
Clothing (Worn)
- Quick-dry hiking pants or shorts
- Moisture-wicking base layer top
- Hiking socks (merino wool preferred)
- Broken-in waterproof hiking boots
- Wide-brimmed sun hat or cap
- Sunglasses with UV protection
Clothing (Packed)
- Waterproof rain jacket with hood
- Waterproof over-pants
- Insulated puffy jacket
- Fleece or synthetic mid-layer
- Spare base layer (top and bottom)
- 2-3 pairs spare socks
- 2-3 pairs spare underwear
- Lightweight camp clothes
- Beanie and lightweight gloves
- Neck gaiter or buff
Food and Cooking
- 3-4 days food (600-900g per day) plus one extra day
- Lightweight stove and fuel canister
- Cooking pot with lid
- Spork or lightweight cutlery
- Collapsible cup
- Biodegradable soap and small cloth
- Food storage bag
Hydration
- 2L water bladder or bottles
- Water purification tablets or filter
Navigation and Safety
- Topographic map of your Great Walk
- Compass
- GPS device or smartphone with offline maps
- Head torch with spare batteries
- Personal locator beacon (PLB) for remote sections
- Emergency whistle
- Emergency survival blanket/bivy
First Aid and Toiletries
- Comprehensive first aid kit
- Blister treatment (Compeed, moleskin)
- Pain relievers and personal medications
- Sunscreen (SPF 50+)
- Insect repellent
- Lip balm with SPF
- Toilet paper and trowel
- Hand sanitizer
- Toothbrush and toothpaste
- Biodegradable soap
- Small quick-dry towel
Essential Accessories
- Trekking poles
- Gaiters (optional but recommended)
- Power bank for electronics
- Rubbish bags (pack out all waste)
- Duct tape (small roll for repairs)
- Sealable bags for electronics
- Hut tickets or booking confirmations
- Earplugs (huts can be noisy)
Your Trail Day Workflow: From Hut to Hut
Understanding how to efficiently pack and unpack each day optimizes your trail experience.
Morning Routine at the Hut
Wake early enough to pack without rushing—hasty packing leads to forgotten items. Start with your sleeping system: stuff your sleeping bag and liner into their compression sacks immediately. Next, organize yesterday's worn clothes. If they're damp, use hut drying rooms overnight or pack them in a separate stuff sack away from dry clothes. Repack your food bag, moving today's snacks to easily accessible locations (hip belt pockets or top of pack). Fill all water containers completely before leaving—the next water source might be hours away.
Follow a consistent packing sequence every morning: sleeping system, clothing, food, water, electronics, toiletries. This routine prevents those frustrating moments when you realize you've left essential items behind at the hut.
On-Trail Organization
Keep frequently needed items in consistent, accessible spots: rain jacket in pack's top pocket (weather changes fast), snacks in hip belt pocket, phone in accessible location, water bottles in side pockets, and trekking poles in hands or attached to pack. When you stop for breaks, remove only what you need. Eat your snack, adjust layers if necessary, and get moving again rather than opening your entire pack.
Arriving at the Next Hut
Claim your bunk first, then systematically unpack. Remove items in reverse order of packing: rain gear and layers to drying areas, wet clothes to drying racks, sleeping system to bunk, food to cooking area, electronics to charging station. Keep tomorrow's trail clothes and toiletries easily accessible. Everything else can stay organized in your pack for quick morning repacking.
Advanced Tips for Great Walks Success
These techniques are refined through experience on New Zealand's demanding trails.
The Pre-Trip Shake-Down Hike
One week before your Great Walk, load your pack completely and take it on a 4-5 hour day hike with elevation gain. This reveals problems: uncomfortable hip belt, items poking your back, insufficient or excessive clothing layers, pack capacity issues, and items you forgot. Making adjustments at home is far easier than the night before your Great Walk.
The Stuff Sack Color System
Use consistent colors for your dry bags: blue for layers, red for food, yellow for electronics, green for toiletries, and orange for first aid. This visual system works even when exhausted. You instinctively reach for the blue bag when you need your fleece, requiring no mental effort.
The Double Bag Method for Critical Items
For electronics and items that absolutely cannot get wet, use double waterproof protection: device in zip-lock bag, zip-lock bag in dry sack. This approach prevents moisture damage even if your pack cover and outer layers become saturated.
Weight Distribution Adjustments Throughout the Day
As you consume food and water, your pack's weight and balance shift. Every few hours, particularly after meals, re-evaluate your shoulder and hip belt tension. Small adjustments prevent end-of-day discomfort. Compress your pack's compression straps after eating bulk food to stabilize the load.
The Emergency Layer Technique
Keep one complete outfit in a waterproof stuff sack at the bottom of your pack: base layer, socks, underwear. This emergency dry set provides crucial backup if your primary clothing becomes soaked. In cold weather scenarios, having dry clothing available is genuinely important.
Pack Smart, Hike Happy: Your Great Walks Journey Awaits
Proper backpack packing transforms challenging multi-day hikes into manageable, enjoyable adventures. The three-zone packing system keeps gear organized and accessible. Proper weight distribution protects your body from injury and fatigue. Waterproofing strategies ensure your gear stays dry in Fiordland's relentless weather. Quality gear makes every trail kilometer more comfortable.
Remember the fundamentals: bottom zone for sleeping gear, middle zone for heavy items close to your back, top zone for frequently accessed layers, waterproof pack liner before adding anything, 80% of weight on hips through proper hip belt adjustment, and organize with color-coded dry bags. Master these principles and you'll hike faster, more comfortably, and with greater confidence.
New Zealand's Great Walks rank among the world's most spectacular multi-day hiking experiences. Whether you're planning the Kepler Track's alpine ridges, the Milford Track's dramatic waterfalls, or the Routeburn's pristine valleys, proper packing preparation directly impacts your enjoyment and safety.
Explore our growing collection of Great Walks trail guides to start planning your adventure. Check current track conditions and book your huts early through DOC, as these walks fill up months in advance during peak season. When you're standing at a Great Walks hut watching the landscape around you, properly packed and comfortable after a long day on the trail, you'll understand why these preparation details matter.
The mountains are waiting. Pack smart, hike safe, and make memories that last a lifetime on New Zealand's incredible Great Walks.
More from the Blog
The 9 Secrets of a Long and Happy Life
Every Trail Tells a Story: Finding Freedom in the Simple Act of Walking
Best Hiking Boots: Lowa Tibet GTX
Best Rain Jackets For New Zealand Great Walks
Best Hiking Boots Guide 2025–2026 : Top Picks for Worldwide Adventures
The Finest Milford Track: A Wet and Bumpy Milford Track